Basic Introduction to Layouts
by TheSkunk (7 February 2018)
- What are Layouts?
- Why Layouts?
- Getting Started: Workflow
- A Basic Introduction
- Making your first real Layout
- Other Cool Tricks
- Learning Resources
- Basic Troubleshooting
- Credits
What are Layouts?
Layouts are a way of creating or modifying Dialogs (or the User Interface) for your SC2 Arcades by writing XML rather than the traditional means of using Triggers. For an example, this creates a full-screen image:
<?xml version="1.0" encoding="utf-8" standalone="yes"?>
<Desc>
	<Frame type="Frame" name="GameUI/UIContainer" file="GameUI">
		<Frame type="Image" name="ScreenFade">
			<Anchor side="Top" relative="$parent" pos="Min" offset="0"/>
			<Anchor side="Bottom" relative="$parent" pos="Max" offset="0"/>
			<Anchor side="Left" relative="$parent" pos="Min" offset="0"/>
			<Anchor side="Right" relative="$parent" pos="Max" offset="0"/>
			<Texture val="Assets/Textures/Loading Screen.dds"/>
			<Width val="3000"/>
			<Height val="2000"/>
		</Frame>
	</Frame>
</Desc>
Why Layouts?
Layouts are:
- Faster and easier to create
- More powerful
- Achieve more responsive results
Aside from the fact that typing (or copy+pasting) XML is faster than using the trigger editor, the ability to do things like create your own templates greatly increases the speed and convenience of using layouts. For minor changes, like adjusting the size and positioning of items, you can actually refresh your changes in the game live, instead of relaunching the map every time you want to see the smallest change.
There are also properties and frame types you simply cannot change or create via triggers, and cool animations or state-groups only possible with layouts. Some visual aspects, like effects when you mouse over dialog items, which would previously require a trigger with a mouse-over activation event, can be done purely with layouts which makes them more responsive.
There are a lot of compelling reasons to use layouts, and they aren’t actually that hard to learn!
Getting Started: Workflow
- Set up a Layouts dependency mod
- Download Notepad++ or similar alternative
Getting started and setting up your work flow can be the most intimidating part of learning Layouts, particularly if you are a beginner map maker and aren’t familiar with saving mods as .SC2Components.
Setting up a Layout Dependency Mod
- Open the SC2 Editor, go to “File > New > Dependent Mod”
- The dependencies you choose (LotV, Campaign, etc) don’t matter
- Once created, access the UI module by clicking the UI module button or pressing “Shift+F6”.

- In the UI module, Right Click and select Add Layout.
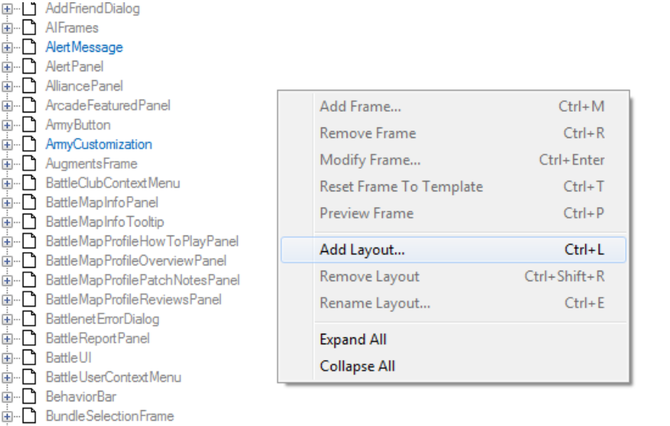
- Name it “MainFrame”
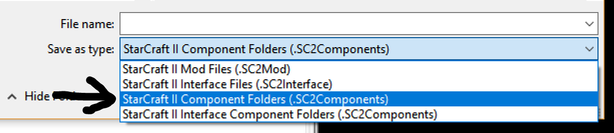
- Save your mod as .SC2Components, and save it under “C:\StarCraft II\Mods” or your equivalent folder.
Now close the mod, and open (or create) the map you wish to create layouts for.
In your map go to File > Dependencies. Select Add Other. Select the Layout Mod and hit “OK”. Once you’ve added this, save your map.
NotePad++
Which is easier to read:
<?xml version="1.0" encoding="utf-8" standalone="yes"?>
<Desc>
	<Frame type="Frame" name="GameUI/UIContainer" file="GameUI">
		<Frame type="Image" name="LoadingScreenFade">
			<Anchor side="Top" relative="$parent" pos="Min" offset="0"/>
			<Anchor side="Bottom" relative="$parent" pos="Max" offset="0"/>
			<Anchor side="Left" relative="$parent" pos="Min" offset="0"/>
			<Anchor side="Right" relative="$parent" pos="Max" offset="0"/>
			<Texture val="Assets/Textures/Loading Screen.dds"/>
			<Width val="3000"/>
			<Height val="2000"/>
		</Frame>
	</Frame>
</Desc>
OR
<?xml version="1.0" encoding="utf-8" standalone="yes"?>
<Desc>
	<Frame type="Frame" name="GameUI/UIContainer" file="GameUI">
		<Frame type="Image" name="LoadingScreenFade">
			<Anchor side="Top" relative="$parent" pos="Min" offset="0"/>
			<Anchor side="Bottom" relative="$parent" pos="Max" offset="0"/>
			<Anchor side="Left" relative="$parent" pos="Min" offset="0"/>
			<Anchor side="Right" relative="$parent" pos="Max" offset="0"/>
			<Texture val="Assets/Textures/Loading Screen.dds"/>
			<Width val="3000"/>
			<Height val="2000"/>
		</Frame>
	</Frame>
</Desc>
?
This “syntax highlighting” makes it easier to spot mistakes and gives a little more order to the chaos of XML. You can use any program capable of syntax highlighting XML, but if you don’t already have a favorite, I recommend downloading Notepad++ because it’s lightweight and gets the job done.
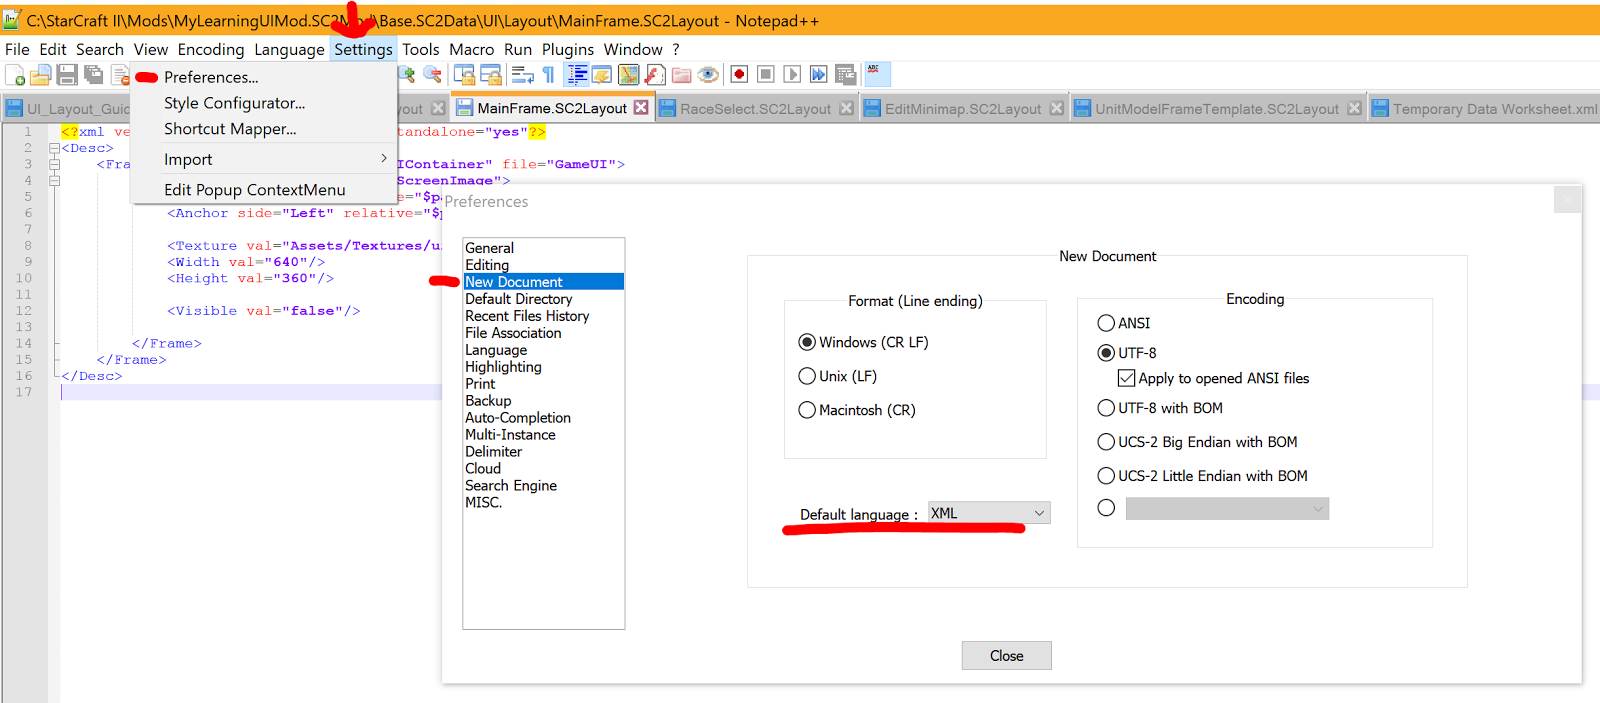
Once you’ve installed it, go to Settings > Preferences > New Document and set Default Language to XML.
A Basic Introduction
Now that we’ve done the obnoxious setup, we can get started for real. To open your layout file, use file explorer to navigate to where you saved your layouts .SC2Components file. From there, open the Base.SC2Data folder, then the UI folder, then the Layout folder. After that, you should see your MainFrame.SC2Layout file, like so:

Open this file in NotePad++ or your program of choice:

It will look more or less like this:

To start off, try copy-pasting this text into your layout file:
<?xml version="1.0" encoding="utf-8" standalone="yes"?>
<Desc>
	<Frame type="Frame" name="GameUI/UIContainer" file="GameUI">
		<Frame type="Image" name="FullScreenImage">
			<Anchor side="Top" relative="$parent" pos="Min" offset="0"/>
			<Anchor side="Bottom" relative="$parent" pos="Max" offset="0"/>
			<Anchor side="Left" relative="$parent" pos="Min" offset="0"/>
			<Anchor side="Right" relative="$parent" pos="Max" offset="0"/>

			<Texture val="Assets/Textures/ui_glues_voidlogoloadingscreen.dds"/>
		</Frame>
	</Frame>
</Desc>
Then hit Save or Save All in Notepad++ to save your Layout.
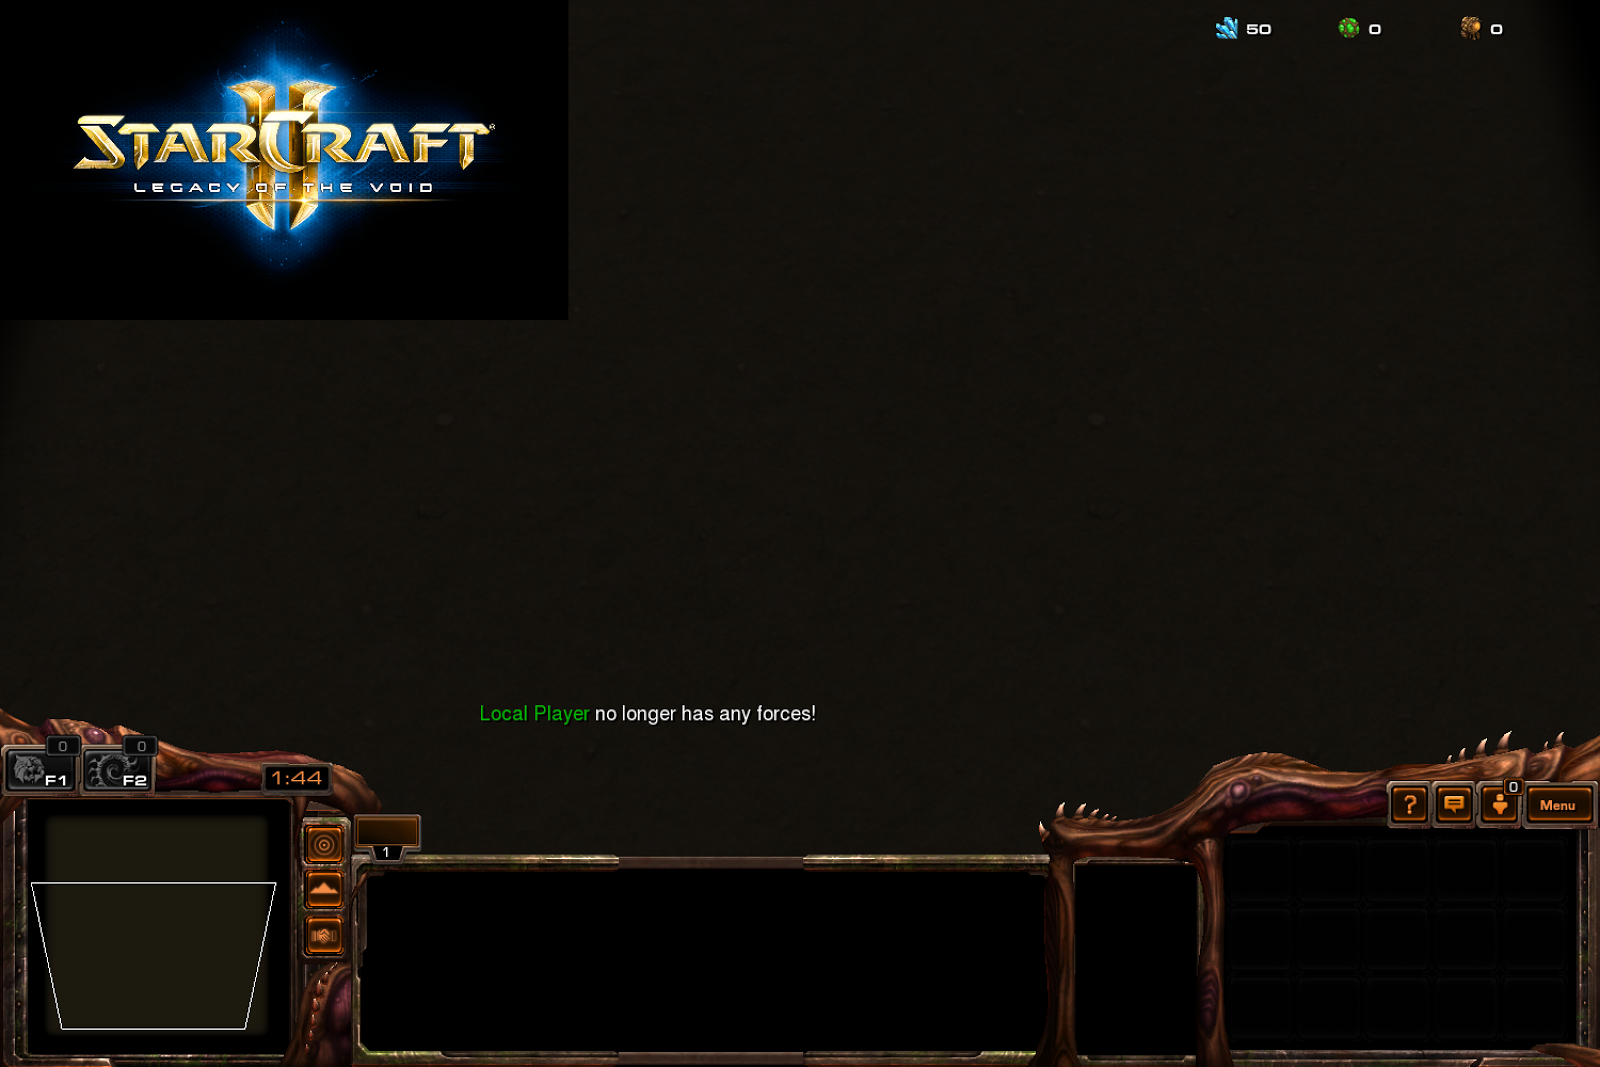
In the editor, your map should still be open. Because the layout file you edited is actually part of your mod that your map is using, when you edit and save .SC2Layout files in Notepad++, they will automatically update for your map - no need to save or reload the map file. All you need to do is hit that test map button and see how it looks! If all went well, you should be greeted in-game by a full-screen SC2 LotV Logo:

Now, to explain that XML a bit more:
<?xml version="1.0" encoding="utf-8" standalone="yes"?>
<Desc>
	<Frame type="Frame" name="GameUI/UIContainer" file="GameUI">
		<Frame type="Image" name="FullScreenImage">
			<Anchor side="Top" relative="$parent" pos="Min" offset="0"/>
			<Anchor side="Bottom" relative="$parent" pos="Max" offset="0"/>
			<Anchor side="Left" relative="$parent" pos="Min" offset="0"/>
			<Anchor side="Right" relative="$parent" pos="Max" offset="0"/>
			<Texture val="Assets/Textures/ui_glues_voidlogoloadingscreen.dds"/>
		</Frame>
	</Frame>
</Desc>
The dialogs which make up User Interfaces for SC2 are composed out of Frames. A “Frame” can be anything from an Image to a Button. Most of the time, UI is made out of a multitude of different frames, often nested within each other. Usually, it beings with a container Frame that is of the frame type “Frame”.
Our tutorial frames are going to start like this:
<?xml version="1.0" encoding="utf-8" standalone="yes"?>
<Desc>
	<Frame type="Frame" name="GameUI/UIContainer" file="GameUI">

	</Frame>
</Desc>
GameUI is a .SC2Layout the game automatically creates to hold UI. UIContainer is a frame inside that Layout that holds the default SC2 UI, so it is a natural place to put your layouts. This doesn’t create anything new per se, it just tells the game where we want our frames to be created.
Now, the actual new frame we created was this:
<Frame type="Image" name="FullScreenImage">
      <Anchor side="Left" relative="$parent" pos="Min" offset="0"/>
      <Anchor side="Right" relative="$parent" pos="Max" offset="0"/>
      <Anchor side="Top" relative="$parent" pos="Min" offset="0"/>
      <Anchor side="Bottom" relative="$parent" pos="Max" offset="0"/>

      <Texture val="Assets/Textures/ui_glues_voidlogoloadingscreen.dds"/>
</Frame>
A basic frame declaration looks like this:
<Frame type="Image" name="FullScreenImage">
You declare the type of frame with type= and then give it a name with name=. You can view a list of most Frame types here: https://sc2mapster.wiki.gg/UI/Frame_Types
If you’ve made Dialogs with Triggers before, some of them like “Labels” or “Buttons” you should already be familiar with.
In our case, we created an image – pretty straight-forward. Everything after that is indented further, and defines the property of this frame – until it is closed with </Frame>.
Anchors
The first property we defined was Anchors:
     <Anchor side="Left" relative="$parent" pos="Min" offset="0"/>
      <Anchor side="Right" relative="$parent" pos="Max" offset="0"/>
      <Anchor side="Top" relative="$parent" pos="Min" offset="0"/>
      <Anchor side="Bottom" relative="$parent" pos="Max" offset="0"/>
Again, if you’re used to making Triggers via Dialogs, you’re probably familiar with the basic concept of Anchors – but it’s more complex with layouts. For one thing, Anchors can actually determine the size of frames in Layouts. You notice we do not ever set a size value for our image. Instead, our Anchors determine the size.
Anchors are composed of these for basic values, in layman’s terms:
<Anchor side="Top" relative="$parent" pos="Min" offset="0"/>
- Side: What side of the frame is being “pulled”
- Relative: To what other frame is this frame being “pulled” towards
- Pos: How far you want the side to go in it’s given direction. You can use real values to specify a percentage along the horizontal or vertical axis instead of Min, Max, or Mid – for an example, 0.5 is equivalent to Mid
- Offset: Offset (in pixels) for the given anchor

You can think of anchors as little grappling hooks that pull the edges of a frame in a given direction. For an example, this anchor:
<Anchor side="Left" relative="$parent" pos="Min" offset="0"/>
Is pulling the Left Side to the Min most direction on left-right axis, relative to its parent frame. So in the case of our “Image” frame and it’s anchors:
     <Anchor side="Left" relative="$parent" pos="Min" offset="0"/>
      <Anchor side="Right" relative="$parent" pos="Max" offset="0"/>
      <Anchor side="Top" relative="$parent" pos="Min" offset="0"/>
      <Anchor side="Bottom" relative="$parent" pos="Max" offset="0"/>
Because our “Parent” frame is the entire GameUI/UIContainer, it pulls each individual side as far as it can go, the edge of the screen. Because no size is set for our image, these Anchors determine its size.
Let’s change that, and set a fixed size! Replace your XML with this:
<?xml version="1.0" encoding="utf-8" standalone="yes"?>
<Desc>
	<Frame type="Frame" name="GameUI/UIContainer" file="GameUI">
		<Frame type="Image" name="FullScreenImage">
			<Anchor side="Top" relative="$parent" pos="Min" offset="0"/>
			<Anchor side="Left" relative="$parent" pos="Min" offset="0"/>

			<Texture val="Assets/Textures/ui_glues_voidlogoloadingscreen.dds"/>
			<Width val="640"/>
			<Height val="360"/>
		</Frame>
	</Frame>
</Desc>
Save, and then test with the editor again. Now our image will be a set size, anchored to the top-left:
You can learn more about anchors by reading this tutorial by rtschutter, and you can use this image as a reference:

For an example, try changing the position of the image to any of the four corners, or centered in the middle:
Top Right:
<Anchor side="Top" relative="$parent" pos="Min" offset="0"/>
<Anchor side="Right" relative="$parent" pos="Max" offset="0"/>
Bottom Right:
<Anchor side="Bottom" relative="$parent" pos="Max" offset="0"/>
<Anchor side="Right" relative="$parent" pos="Max" offset="0"/>
Bottom Left:
<Anchor side="Bottom" relative="$parent" pos="Max" offset="0"/>
<Anchor side="Left" relative="$parent" pos="Min" offset="0"/>
Centered:
<Anchor side="Top" relative="$parent" pos="Min" offset="0"/>
<Anchor side="Left" relative="$parent" pos="Min" offset="0"/>
<Anchor side="Right" relative="$parent" pos="Max" offset="0"/>
<Anchor side="Bottom" relative="$parent" pos="Max" offset="0"/>
And try setting “offset” to 25 for some margins/padding!
Making your first real Layout
Let’s make something practical, that you may have done before in Triggers: a race selection screen. There are some more basics you need to learn:
- Creating new Layouts
- Hooking up Layouts in Triggers
Although you could keep working in your current layout file, you need to know how to create new Layouts. To start off with, go back to File Explorer where you navigated to your Layouts folder:

Copy and paste your “Main Frame.SC2Layout”. Rename it to “RaceSelect”.
Then, open DescIndex.SC2Layout in Notepad++.
DescIndex is basically a list of all of your layouts, so the game knows what to load. You just need to duplicate the “Include” line and change the name to your new RaceSelect layout, so the DescIndex file looks like this:

Save and close out of DescIndex, and open your RaceSelect.SC2Layout.
Remember, you always want this as your starting point:
<?xml version="1.0" encoding="utf-8" standalone="yes"?>
<Desc>
	<Frame type="Frame" name="GameUI/UIContainer" file="GameUI">

	</Frame>
</Desc>
Before we just created an image. However, if your Dialog is going to include more than one Frame, you generally want to create a container Frame for it. Think of the “Frame” type of Frame as an equivalent to your Trigger’s “Dialog” – it’s not anything by itself, it’s just a container for Dialog Items – or, in our case, other frames and frame types. Inside our frame, we are going to create:
- An Image (The Background)
- A Label (Title saying “Choose Race”)
- Three Buttons (A button for each race)
So, let’s say we want this “Dialog” – or, more accurately, a “Frame” type of frame called “Container Frame” to be 800x600 and be centered on the screen:
<?xml version="1.0" encoding="utf-8" standalone="yes"?>
<Desc>
	<Frame type="Frame" name="GameUI/UIContainer" file="GameUI">
		<Frame type="Frame" name="ContainerFrame">
			<Anchor side="Top" relative="$parent" pos="Min" offset="0"/>
			<Anchor side="Left" relative="$parent" pos="Min" offset="0"/>
			<Anchor side="Bottom" relative="$parent" pos="Max" offset="0"/>
			<Anchor side="Right" relative="$parent" pos="Max" offset="0"/>

			<Height val="800"/>
			<Width val="600"/>
		</Frame>
	</Frame>
</Desc>
It’s important to note that unlike trigger Dialogs, frames don’t look like anything. This currently will be invisible. But we want a nice background to our Dialog, and do to this, we’ll need to create an image. Remember to use proper indentation - to this end, remember you can indent with “Tab” and un-indent with Shift-Tab.
Generally, keep all of your anchors at the top, and a space between them and the rest of the properties – as you can see above. Furthermore, include a space before and after nested frames. With that in mind, create our background image so our XML looks like this:
<?xml version="1.0" encoding="utf-8" standalone="yes"?>
<Desc>
	<Frame type="Frame" name="GameUI/UIContainer" file="GameUI">
		<Frame type="Frame" name="ContainerFrame">
			<Anchor side="Top" relative="$parent" pos="Min" offset="0"/>
			<Anchor side="Left" relative="$parent" pos="Min" offset="0"/>
			<Anchor side="Bottom" relative="$parent" pos="Max" offset="0"/>
			<Anchor side="Right" relative="$parent" pos="Max" offset="0"/>

           			 <Height val="600"/>
           			 <Width val="800"/>

			<Frame type="Image" name="Background">
				<Anchor relative="$parent"/>

				<Texture val="Assets/Textures/ui_ingame_tutorial_textborder_terr.dds"/>
				<TextureType val="NineSlice"/>
			</Frame>

		</Frame>
	</Frame>
</Desc>
Finding Textures
In the SC2 editor, if you go to Window > Console, and then type “Browse” into the console, you can search for textures, models, etc. If you enter “Assets/Textures/ui” into the search, it’s a good way to look for textures to use in your UI.
Texture Types
Different textures have to be set to different Texture Types. Ours is NineSlice, but you can see the Wiki for other TextureTypes.
<Anchor relative="$parent"/>
Just using the Relative property without Side or Pos is basically saying “use the same anchors as the relative frame” which in this case, is the parent frame.
Now we need to add our Label:
<?xml version="1.0" encoding="utf-8" standalone="yes"?>
<Desc>
	<Frame type="Frame" name="GameUI/UIContainer" file="GameUI">
		<Frame type="Frame" name="ContainerFrame">
			<Anchor side="Top" relative="$parent" pos="Min" offset="0"/>
			<Anchor side="Left" relative="$parent" pos="Min" offset="0"/>
			<Anchor side="Bottom" relative="$parent" pos="Max" offset="0"/>
			<Anchor side="Right" relative="$parent" pos="Max" offset="0"/>

          			 <Height val="600"/>
            			<Width val="800"/>

			<Frame type="Image" name="Background">
				<Anchor relative="$parent"/>

				<Texture val="Assets/Textures/ui_ingame_tutorial_textborder_terr.dds"/>
				<TextureType val="NineSlice"/>
			</Frame>

			<Frame type="Label" name="Title">

				<Anchor side="Top" relative="$parent" pos="Min" offset="60"/>
				<Anchor side="Left" relative="$parent" pos="Mid" offset="0"/>
				<Anchor side="Right" relative="$parent" pos="Mid" offset="0"/>

				<Style val="TutorialMenuTitle"/>
				<Width val="600"/>
				<Text val="Choose your race"/>
			</Frame>

		</Frame>
	</Frame>
</Desc>
(Tip: Go to the Text editor (F8) and click on “Font Styles” to search for font styles or create your own.)
Introduction to Templates
So at this point, we want to create our Buttons. But if you just created a “Button” frame, you’d find that it’s invisible – just like our “Frame”. To make a Button actually look like something, we’d have to create an image inside of it. And to make our Button have text, we’d have to create a Label inside of it. And so on!
Luckily, you don’t have to tediously construct a Button out of other frame types. You can just create your Button using a Template that already has images set up:
<Frame type="Button" name="ChooseButton" template="StandardTemplates/StandardButtonTemplate">
Of course, this is just one Template you can use. If you open the UI Editor (Shift-F6) in the SC2 editor, you can find Templates by searching for them. Many Templates can be found in the “StandardTemplates” folder.
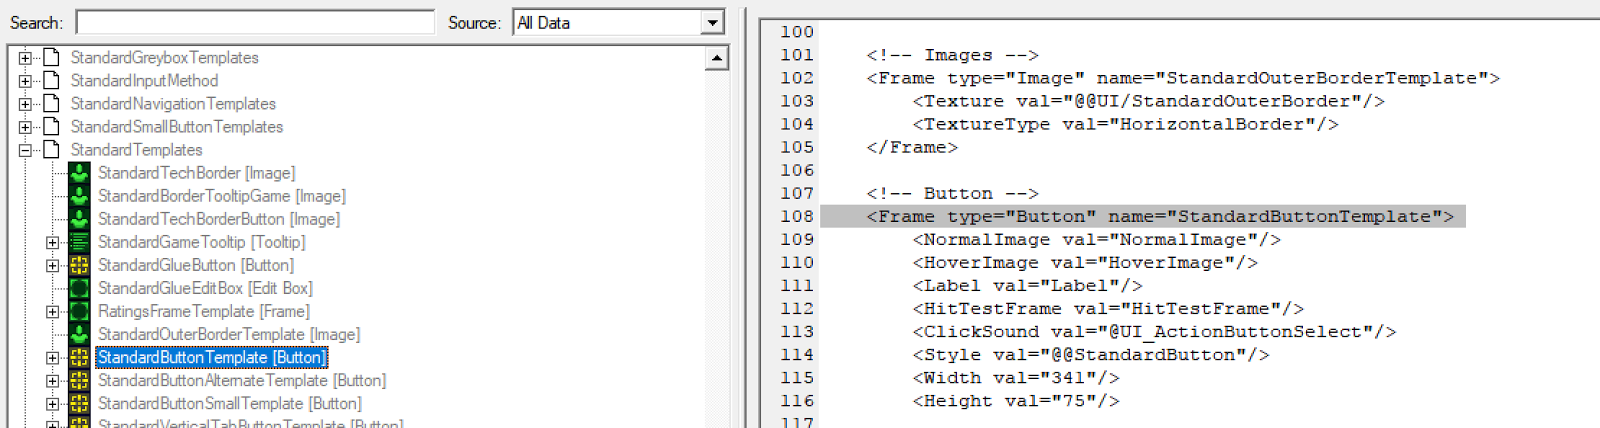
Once you have created something from a Template, to edit the child-frames created by the template, you just have to “recreate” them. To this end, you sometimes have to look up your template. For an example, if you want to change the text of a Button you used during this template, you have to look at the original template to see what the label was called. In this case, our template creates the label like this:
       <Frame type="Label" name="Label">
            <Anchor side="Top" relative="$parent" pos="Min" offset="4"/>
            <Anchor side="Bottom" relative="$parent" pos="Max" offset="0"/>
            <Anchor side="Left" relative="$parent" pos="Min" offset="20"/>
            <Anchor side="Right" relative="$parent" pos="Max" offset="-20"/>
            <DescFlags val="Internal"/>
        </Frame>

So, to modify that label after we’ve created a button using this template, we’d do it like this:

```xml
<Frame type="Button" name="ChooseProtoss" template="StandardTemplates/StandardButtonTemplate">
	<Frame type="Label" name="Label">
		<Text val="Protoss"/>
	</Frame>
</Frame>
Of course, you need to set anchors and, if desired, change other properties about the button:
<Frame type="Button" name="ChooseProtoss" template="StandardTemplates/StandardButtonTemplate">
      <Anchor side="Top" relative="$parent" pos="Min" offset="0"/>
      <Anchor side="Left" relative="$parent" pos="Min" offset="0"/>
      <Anchor side="Bottom" relative="$parent" pos="Max" offset="0"/>
      <Anchor side="Right" relative="$parent" pos="Max" offset="0"/>

      <Height val="100"/>
      <Width val="300"/>

      <Frame type="Label" name="Label">
            <Text val="Protoss"/>
            <Style val="LayoutDebugPanelTitle"/>
      </Frame>
</Frame>
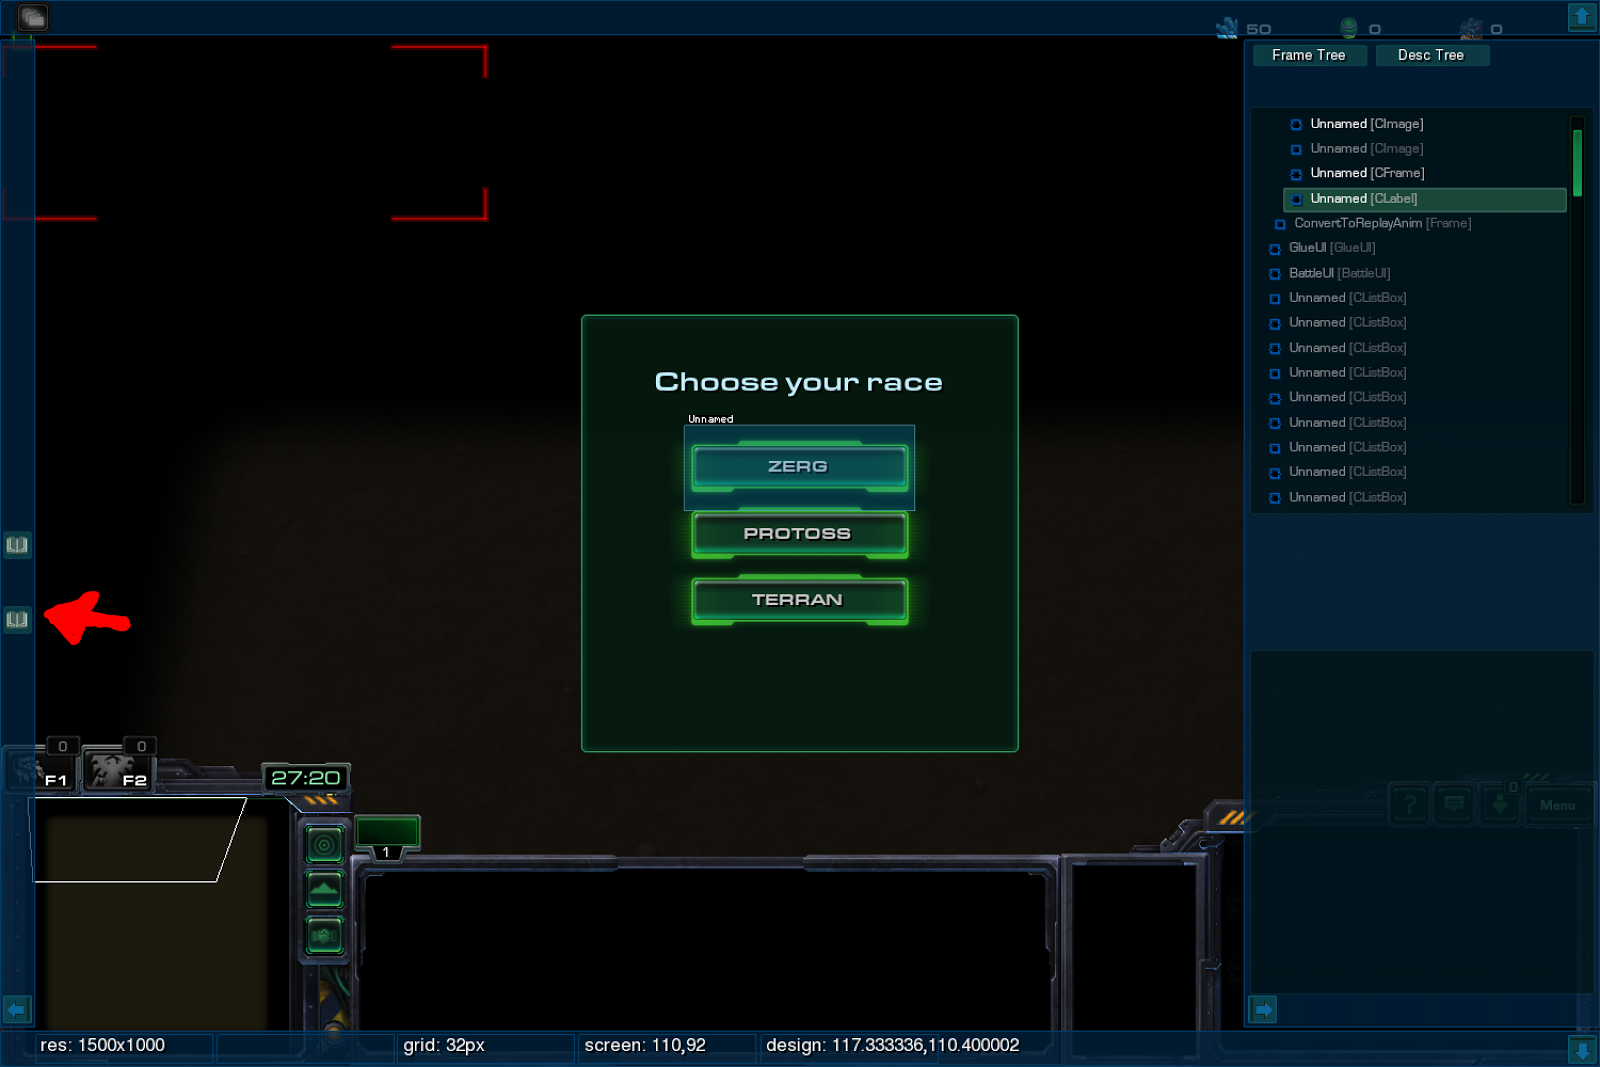
Copy and paste that XML (huge time saver) and create two more buttons and change the names of the frames as well as the text of the label so you have buttons for each race. Your final XML should look like this: https://pastebin.com/hXcxtYrE
Save your layout file, then hit test in the SC2 Editor. Don’t close out the the game once you see how it looks! Just alt-tab back to this tutorial.
Refreshing Game UI
You may notice all of your buttons are anchored to the same position and overlap. When working with Dialogs in Triggers, to get things positioned correctly you’d have to test, close the test, change the position, test again, and repeat until items were positioned where you want them.
With layouts, there is a better way! With your test still open, edit your Layout by adding a offset value to your Zerg and Terran Top anchors:
<Frame type="Button" name="ChooseTerran" template="StandardTemplates/StandardButtonTemplate">
      <Anchor side="Top" relative="$parent" pos="Min" offset="150"/>
      <Anchor side="Left" relative="$parent" pos="Min" offset="0"/>
      <Anchor side="Bottom" relative="$parent" pos="Max" offset="0"/>
      <Anchor side="Right" relative="$parent" pos="Max" offset="0"/>


<Frame type="Button" name="ChooseZerg" template="StandardTemplates/StandardButtonTemplate">
      <Anchor side="Top" relative="$parent" pos="Min" offset="-150"/>
      <Anchor side="Left" relative="$parent" pos="Min" offset="0"/>
      <Anchor side="Bottom" relative="$parent" pos="Max" offset="0"/>
      <Anchor side="Right" relative="$parent" pos="Max" offset="0"/>
Save your layouts, then tab back to your running test and press “Control+Alt+F11”
This will reload the Game UI, and your changes should appear. You can tab back to your Layout and change the offset if you want them to be spaced even further, and do the same thing again. Likewise, you can change the size of your holding frame if you think it looks too wide.
There are some limitations – generally speaking, “Control+Alt+F11” will only update minor value changes like size and offset. You can give it a try, but if a change you made didn’t show up, instead of presuming your edit didn’t work, you should close out of the test and re-launch from the editor. After a while, you will get a feeling for what kind of changes can be updated with “Control+Alt+F11” and what ones require you to restart the test.
You can also use Control+Alt+F12 for a frame viewer. This will allow you to troubleshoot your layouts by seeing if they were created properly or not.
There is a button to the middle-left which allows you to see the properties of a selected item, and the frame tree on the right shows you a hierarchy of created frames. You can mouse around the screen and select Frames. This is useful particularly if a frame you created does not appear at all in-game – you can use this feature to see if it was actually created, and is just invisible for some reason.
Trigger Hookups
Great, we have some buttons – now how do we make them do something? Using layouts, we can make pressing these buttons change other layouts – say, we could make clicking the “Zerg” button change your frame to be Purple.
But you can’t make layouts affect the game itself outside of affecting other parts of the UI/Layouts. Instead, you need to hook up your layout via triggers so that you can cause things to happen via triggers.
Luckily, this is really easy. You just use an action called “Hookup Standard Dialog Item”

Two things are important:
- Frame Type
- The Path
For an example, notice for the Frame I used “Panel” and for the buttons I used “Button” as the frame type. For the path, you just have to follow the hierarchy of your layouts. They all begin with the “UIContainer” we create them in, and you follow the path from there. For our frame, we just need UIContainer/ContainerFrame. For our buttons, we continue that path with UIContainer/ContainerFrame/ChooseProtoss.
As you can see, from there you can set them to variables as they register as “Last created dialog items.” After that, you can use them in triggers like you normally would! Try it out by making it so it spawns you a Zealot, Marine, or Zergling when you press one of the buttons, and then hides the ContainerFrame.
Modifying Existing UI
So far, we’ve created our own UI elements. What if you wanted to modify the default game UI?
This can be done pretty easily, just like you change child frames created by templates all you need to do is “recreate” them using the same names/hierarchy. Let’s give it a shot.
Create a new layout:
- Go to your Base.SC2Data\UI\Layout folder in File Explorer
- Create a new text file and name it whatever you want, ending in .SC2Layout
- Edit DescIndex.SC2Layout to include your new Layout
- Open your new Layout to get started
Now, to edit an existing UI element you need to know it’s hierarchy and the way it’s put together. Generally, you can do this using both the UI Editor and with Control+Alt+F12 when testing in-game. Say we want to edit the mini-map. Hit test map in the editor, use Control+Alt+F12, and click on the Minimap:
You can see how on the right-hand Frame Tree that the hierarchy is “Game UI > UI Container > ConsoleUIContainer > Minimap Panel”
This helps us know the path, but we can take a closer look at the properties by going to the UI editor. Search for “Minimap” and you will find the Minimap Panel. Then you can see it’s child frames and learn about how it’s created:

So, to move the minimap to the middle of the screen and change it’s size, we can do this:
<?xml version="1.0" encoding="utf-8" standalone="yes"?>
<Desc>
    <Frame type="GameUI" name="GameUI" file="GameUI">
        <Frame type="Frame" name="UIContainer">
            <Frame type="Frame" name="ConsoleUIContainer">
	<Frame type="MinimapPanel" name="MinimapPanel">
		<Anchor side="Top" relative="$parent" pos="Min" offset="0"/>
		<Anchor side="Left" relative="$parent" pos="Min" offset="0"/>
		<Anchor side="Bottom" relative="$parent" pos="Max" offset="0"/>
		<Anchor side="Right" relative="$parent" pos="Max" offset="0"/>

		<Height val="500"/>
		<Width val="500"/>

		<Frame type="Minimap" name="Minimap">
			<Height val="500"/>
			<Width val="500"/>
		</Frame>
	        </Frame>
	</Frame>
         </Frame>
     </Frame>
</Desc>
Basically, the frame-viewer in-game is good for knowing the layout of things, and the UI editor is good for knowing their properties (height, width, etc).
Creating Your Own Templates
Templates are a huge part of what makes Layouts so great. How do you create your own?
The same way you create any layout, with two differences.
This isn’t needed:
<Frame type="Frame" name="GameUI/UIContainer" file="GameUI">
So if we wanted to make our image layout from before as a template, we’d do it like this:
<?xml version="1.0" encoding="utf-8" standalone="yes"?>
<Desc>
	<Frame type="Image" name="FullScreenImage">
		<Anchor side="Top" relative="$parent" pos="Min" offset="0"/>
		<Anchor side="Left" relative="$parent" pos="Min" offset="0"/>

		<Texture val="Assets/Textures/ui_glues_voidlogoloadingscreen.dds"/>
		<Width val="640"/>
		<Height val="360"/>

		</Frame>
	</Frame>
</Desc>
The second important thing is that when adding them to your DescIndex.SC2Layout, they need to be above all of your other layouts. I usually add a comment to separate my Templates from my other Layouts:
<?xml version="1.0" encoding="utf-8" standalone="yes"?>
<Desc>
	<!-- Templates -->
   	 <Include path="UI/Layout/UnitModelFrameTemplate.SC2Layout"/>
	<Include path="UI/Layout/StatusBar.SC2Layout"/>
	<!-- Actual Layouts -->
    	<Include path="UI/Layout/MainFrame.SC2Layout"/>
	<Include path="UI/Layout/CutsceneFrame.SC2Layout"/>
	<Include path="UI/Layout/ModifyingCommandCard.SC2Layout"/>
	<Include path="UI/Layout/LearningControlButtons.SC2Layout"/>
	<Include path="UI/Layout/ScrollFrame.SC2Layout"/>
	<Include path="UI/Layout/TabControl.SC2Layout"/>
</Desc>
This is probably a good time to mention that you can turn a line into a comment with “CTRL+K” and un-comment them with “CTRL+SHIFT+K”.
When creating from our template, you reference the name of the layout itself, and then the name of the first frame. You must create a frame of the same type as the first frame of your layout. To use our example, say we saved:
<?xml version="1.0" encoding="utf-8" standalone="yes"?>
<Desc>
	<Frame type="Image" name="FullScreenImage">
		<Anchor side="Top" relative="$parent" pos="Min" offset="0"/>
		<Anchor side="Left" relative="$parent" pos="Min" offset="0"/>

		<Texture val="Assets/Textures/ui_glues_voidlogoloadingscreen.dds"/>
		<Width val="640"/>
		<Height val="360"/>

		</Frame>
	</Frame>
</Desc>
As TemplateImage.SC2layout. To use this as a template when creating a frame in any of our other layout’s, we’d do this:
<Frame type="Image" name=”AnyNameHere" template="TemplateImage/FullScreenImage">
As you can see, the frame type is “Image” because that’s the same type as the first frame in our Template. The Template Path is TemplateImage/FullScreenImage because that’s the name of the template layout file followed by the name of the first frame created within it. Pretty simple stuff!
Other Cool Tricks
Referencing Other Frames
Throughout this tutorial, we’ve used $parent when anchoring:
<Anchor side="Top" relative="$parent" pos="Min" offset="0"/>
Meaning the Anchor is relative to the parent. However, you can reference a lot of other things. Going back to our Race Selection layout, for an example, we could anchor our first race button to the top of the screen, but our other buttons could be anchored to the button itself. In the following example, the Protoss button is anchored to the parent frame, but the Terran button is anchored to the Protoss button and the Zerg button is anchored to the Terran button:
Protoss Button Anchors:
<Frame type="Button" name="ChooseProtoss" template="StandardTemplates/StandardButtonTemplate">
      <Anchor side="Top" relative="$parent" pos="Min" offset="120"/>
      <Anchor side="Left" relative="$parent" pos="Mid" offset="0"/>
      <Anchor side="Right" relative="$parent" pos="Mid" offset="0"/>
Terran Button Anchors:
<Frame type="Button" name="ChooseTerran" template="StandardTemplates/StandardButtonTemplate">
      <Anchor side="Bottom" relative="$parent/ChooseProtoss" pos="Max" offset="100"/>
      <Anchor side="Left" relative="$parent" pos="Mid" offset="0"/>
      <Anchor side="Right" relative="$parent" pos="Mid" offset="0"/>
Zerg Button Anchors:
<Frame type="Button" name="ChooseZerg" template="StandardTemplates/StandardButtonTemplate">
      <Anchor side="Bottom" relative="$parent/ChooseTerran" pos="Max" offset="100"/>
      <Anchor side="Left" relative="$parent" pos="Mid" offset="0"/>
      <Anchor side="Right" relative="$parent" pos="Mid" offset="0"/>
This is cool, because now if you want to move all of the buttons, you can change the Protoss button’s offset from the top of the dialog, and the other two buttons will move with it – rather than having to change 3 values, you only have to change one.
You can learn more about referencing at: https://sc2mapster.wiki.gg/UI/Referencing
Constants
You can define constants to use in your layouts:
<Constant name="Alpha_PlayerBar_Background" val="230"/>
<Constant name="Color_RaceIcon_Background" val="19,19,19"/>
<Constant name="Visible_ExtraUnitInfo" val="False"/>
<Constant name="ToggleUI" val="Control+W"/>
Which you can then reference by prefixing with a #. For an example, we could create a “margin” constant for our Race Select Layout, and use it to track the distance between our buttons:
<Constant name="Margin" val="120"/>

<Frame type="Button" name="ChooseProtoss" template="StandardTemplates/StandardButtonTemplate">
      <Anchor side="Top" relative="$parent" pos="Min" offset="120"/>
      <Anchor side="Left" relative="$parent" pos="Mid" offset="0"/>
      <Anchor side="Right" relative="$parent" pos="Mid" offset="0"/>
</Frame>

<Frame type="Button" name="ChooseTerran" template="StandardTemplates/StandardButtonTemplate">
      <Anchor side="Bottom" relative="$parent/ChooseProtoss" pos="Max" offset="#Margin"/>
      <Anchor side="Left" relative="$parent" pos="Mid" offset="0"/>
      <Anchor side="Right" relative="$parent" pos="Mid" offset="0"/>
</Frame>

<Frame type="Button" name="ChooseZerg" template="StandardTemplates/StandardButtonTemplate">
      <Anchor side="Bottom" relative="$parent/ChooseTerran" pos="Max" offset="#Margin"/>
      <Anchor side="Left" relative="$parent" pos="Mid" offset="0"/>
      <Anchor side="Right" relative="$parent" pos="Mid" offset="0"/>
</Frame>
Now if we want to change the space between the Protoss, Terran, and Zerg buttons later we just have to change our Margin constant. This has a ton of uses, and of course you can store more than just ints with constants.
Asset Referencing
Asset referencing lets you set up layouts to automatically use different textures (and other assets) depending on the race of the player.
A good explanation can be found here: https://sc2mapster.wiki.gg/UI/Referencing#Asset_Reference
You just need to go to your Mod folder in File Explorer,
But back out of your Layout and UI folders. In your Base.SC2Data folder, create a “GameData” folder if one doesn’t exist already, and then create a plain Asset.txt file in it, if one doesn’t exist. Then, as the Wiki suggets, put:
UI/BorderTexture=Assets\Textures\ui_ingame_tutorial_textborder_terr.dds
UI/BorderTexture_Prot=Assets\Textures\ui_ingame_tutorial_textborder_prot.dds
UI/BorderTexture_Zerg=Assets\Textures\ui_ingame_tutorial_textborder_zerg.dds
In your Assets.txt file. Then, go back to your Race Select layout, and change
<Frame type="Image" name="Background">
      <Anchor relative="$parent"/>

      <Texture val="@@UI/BorderTexture"/>
      <TextureType val="NineSlice"/>
</Frame>
Boom! Now your frame will look differently depending on the race of the player.
Stategroups and Animations
You can do a lot with both Animations and State Groups and they are pretty complicated so I wont be explaining them in-depth. I advise reading about them on the Wiki:
- sc2mapster.wiki.gg/UI/Animations
- sc2mapster.wiki.gg/UI/State_Groups
And looking up existing layouts in the game that use them.
Animations
At the very start of the tutorial, I gave you this bit of XML:
<?xml version="1.0" encoding="utf-8" standalone="yes"?>
<Desc>
	<Frame type="Frame" name="GameUI/UIContainer" file="GameUI">
		<Frame type="Image" name="LoadingScreenFade">
			<Anchor side="Top" relative="$parent" pos="Min" offset="0"/>
			<Anchor side="Bottom" relative="$parent" pos="Max" offset="0"/>
			<Anchor side="Left" relative="$parent" pos="Min" offset="0"/>
			<Anchor side="Right" relative="$parent" pos="Max" offset="0"/>

			<Texture val="Assets/Textures/Loading Screen.dds"/>
			<Width val="3000"/>
			<Height val="2000"/>

			<Animation name="Show">
				<Event event="OnShown" action="Reset,Play"/>

				<Controller type="Fade" end="Pause">
					<Key type="Curve" time="0" value="255" out="Slow"/>
					<Key type="Curve" time="3" value="0" in="Slow"/>
				</Controller>
			</Animation>
		</Frame>
	</Frame>
</Desc>
…containing a basic animation.
This animation is triggered “OnShown” meaning as soon as the Layout becomes visible - in Trigger terms, this is the “Event.” Controllers are the “Actions” - this one is a Fade, meaning it changes the transparency, or alpha, of the frame. Keys are like keyframes in traditional animation: they dictate what the value should be at what time. In this case, the first Key begins at 0 seconds (immediately) and sets the frame to fully visible. The second key occurs at 3 seconds, and sets the alpha to 0. This means the animation makes the frame fade from fully visible to fully transparent over 3 seconds, as soon as it is shown. This: action=”Reset,Play”/> means that every time the animation is triggered by the Event (OnShown) it resets the animation back to the first Key, and plays again. Like triggers, your animations can also have conditions. So, for our animation:
<Animation name="Show">
	<Event event="OnShown" action="Reset,Play"/>

	<Controller type="Fade" end="Pause">
		<Key type="Curve" time="0" value="255" out="Slow"/>
		<Key type="Curve" time="3" value="0" in="Slow"/>
	</Controller>
</Animation>
Event: OnShown Action: Reset, Play Controller: Fade End: Pause (The animation only plays once)
Try adding this animation to one of your own layouts. Then, go to the Wiki and look for other events, actions, controllers, and controller ends to try for different effects. Try changing the controller End type from Pause to “PingPong”
StateGroups
StateGroups are pretty cool too, allowing you to set various states frames can be in. For an example, I made a more complex race select UI where the main frame had a State for each race, and this State changed the look of the frame. In turn, all of my race selection buttons had an animation that set the state of my parent frame. The result looked like this: https://streamable.com/ovymf
If you want a challenge, you can copy the XML for that frame here: https://pastebin.com/9wKessCm
And try to learn how Stategroups can be used and how they can interact with animations. In general, I advise looking at other layouts to see how State Groups can be used.
Learning Resources
How do you learn more from here? I advise looking up Frame Types and Frame Properties on the Wiki.
- Frame Types: https://sc2mapster.wiki.gg/UI/Frame_Types
- Frame Properties: https://sc2mapster.wiki.gg/UI/Frame_Properties
Anything that’s yellow has more information about if you click on it – you can start by skimming those, looking for anything you think you’ll want to use.
But as you’ll quickly find out, the wiki is missing vast amounts of information. The next step is usually to search up that frame type or property in the UI editor. The search bar is kind of useless, but you can use “Control+F” and check “Search All Layouts”
For an example, as of writing this the Wiki has nothing on ScrollableFrame. So just search the UI editor for examples with Control+F like this:
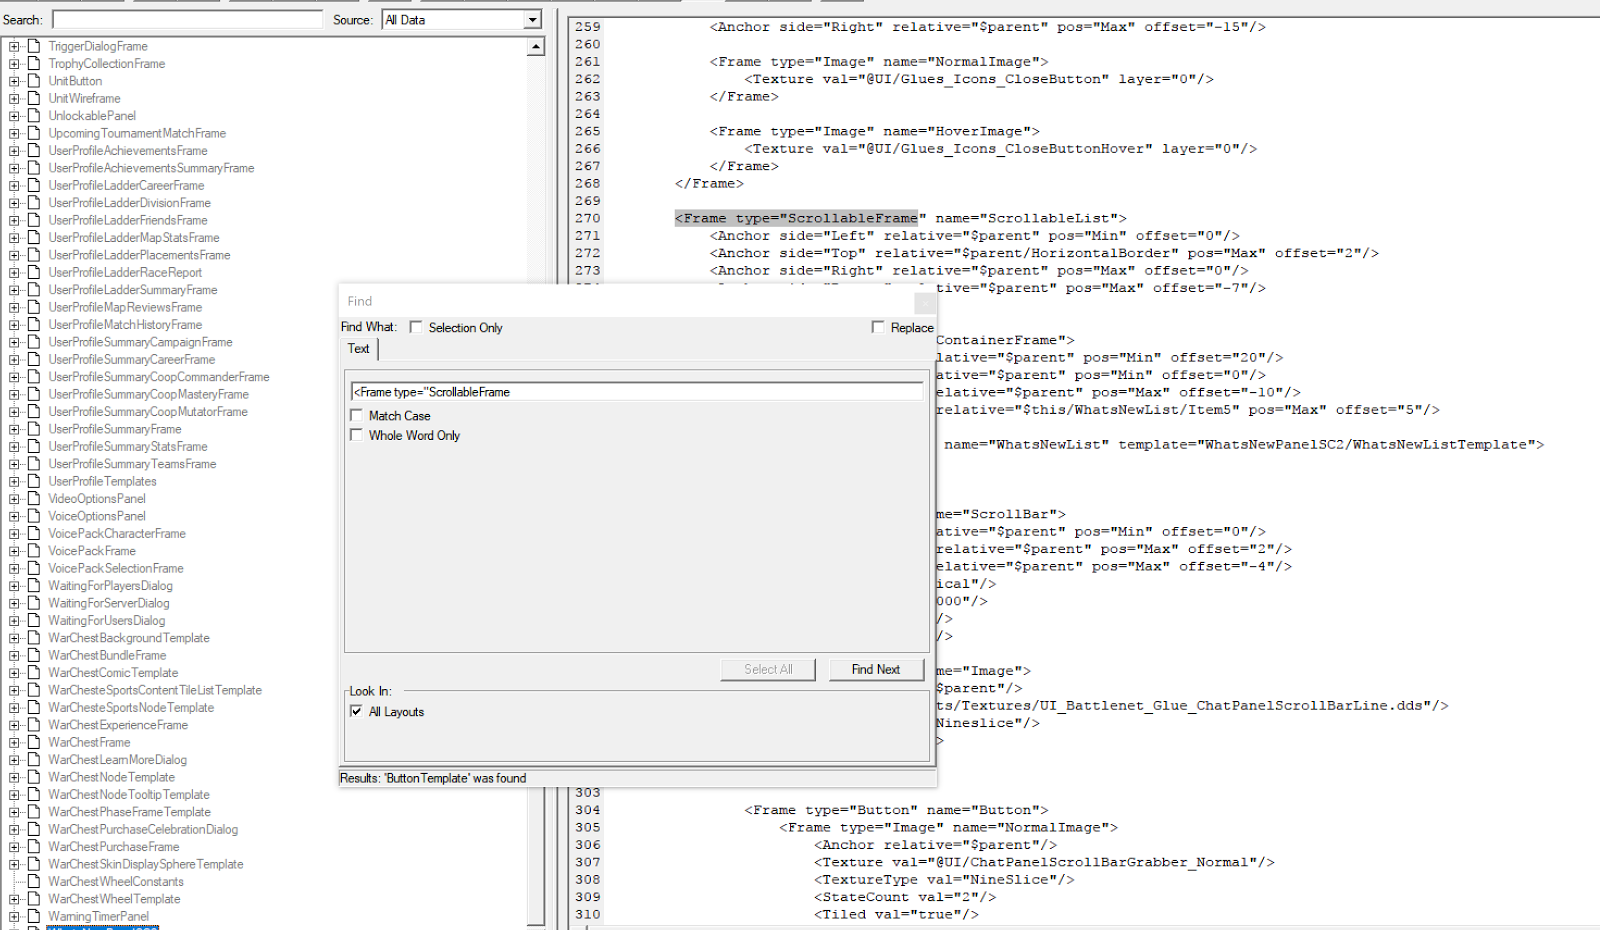
As you can see, it turned up a ScrollableFrame. Usually, the best thing to do is copy all of this frame into your own layout and then tinker with it to see how things work.
Often times you can learn from Heroes of the Storm layouts, since they are similar. Of course, if you run into trouble you can always ask the kind folks in the #userinterface channel on the Sc2mapster Discord: https://discord.gg/sNkMufq
They were very patient in babysitting me until I got the hang of things. Two tips: Share long XML using https://hastebin.com
Shorter XML you can make properly formatted like so:

Result:

Basic Troubleshooting
Number one tip: Pay attention to errors. Errors appear at the top of your screen in red. You may be in the habit of closing those out as soon as you test, but don’t do that. They’re useful.
Some examples:

This means the font style doesn’t exist. You probably have this error if you followed this tutorial exactly, because that’s a typo I made when setting the font style for the button labels. It shouldn’t have the word “Layout” in it. You can delete that line entirely, fix it, or look up or create your own Font Style to use instead. This was a genuine mistake on my part, but I left it in so you could learn troubleshooting.

Anytime an error ends with “XML: not well-formed” it means you goofed up your syntax. Common errors include missing quotation marks, equals signs, brackets, or slashes. In this case, I’m missing a “>” at the end of this line:

The full error message told me the error was on line 34. Usually the mistake happens a line before. NotePad++ shows line counts to the left, so I could easily scroll to line 33 and find my mistake.
Any Error With “Anchor” in it
If an error message has “Anchor” in it, you probably screwed up your Anchors somehow!
Any Error With “[Frame] not able to be hooked up in [Path]”
While you may have done your hookups via triggers wrong, try fixing your other errors first. Good chances this appears just because a different error broke your Layout, and because your layout is broken, it obviously can’t be hooked up via triggers because it failed to be created in the first place.
Help? My frame isn’t showing up!
If Created from a Template: Make sure your frame type is the same as the frame type of your template. Double-Check the frame types match. If Not: You probably screwed up anchors/sizing. It’s easy to do. Keep fiddling with anchors and/or set a height/width for your frame. Try copying anchors you know work from a different frame to troubleshoot.
My changes didn’t appear!
When I first started, this would happen a lot just because I forgot to save my Layouts in NotePad++ before testing – or back before I realized Control+Alt+F11 doesn’t load all changes.
Credits
Thanks to Pirate, who not only had a significant part in teaching me layouts – but also I copied a bit from his tutorial
Thanks to rtschutter, I link to his WIP anchoring tutorial
Thanks to everyone in the sc2mapster #userinterface channel who taught me layouts, some names: Pirate, willuwontu, Broot, ArcaneDurandel, rtschutter, and Pirate
tags: ui - layout